
Summer Camp 2 (August 2015)

This new Summer Camp event didn't come as much of a surprise, seeing as the developers have been lazy recently and have recycled old event concepts from 2014. However, similar to Salute Our Troops and Easter Egg Hunt 2, this Summer Camp 2 event brings some changes along, making it a different event from the original Summer Camp. While the same week-by-week concept with specific weapon requirements has been retained, the prizes and tasks have been changed completely. Now, the event weapon is no longer the Dual Rookie Machine Guns, but rather the new Semi Automatic Sniper, the first new sniper that has been added in over a year and a half.
For those who didn't catch the original Summer Camp, the event is unlike the others in that it is more like a series of four mini-events, called "trials" (or weeks in the original). In each trial, which lasts for one week, a new "mini-event" goes up, with a new series of challenges and a new weapon class to focus on. For example, on the first week-long trial is the Shotgun Mastery trial, in which players may only use select shotgun weapons to pass tiers. The challenges involve winning matches with designated weapons, killing an amount of players in one match and other skill-based tasks. Trial 4 was different from the others, in that in that it allowed any weapon in the game and had 20 tiers, not 6, also making it the event with the most tiers in the entire game.
The event brought along two new bundles. The Road Warrior Bundle introduces brand new gear that weakens shotguns, snipers and explosives by 20%. The Summer Camp Gun Collection re-introduces the Hunter Shotgun, Hunter Rifle and Dragon's Breath Cannon. Both are premium items and cannot be obtained in the event. The gear from the Close Quarters Bundle (besides the Immunity Shields) can be earned across different trails (or weeks) in the event. Similar to past events, if you already own parts of the Close Quarters Bundle, you will skip tiers that feature the parts as a prize. If you don't own them, you can purchase them with real currency to skip the tiers.
An interesting thing to note about this event is that the Dragon's Breath Cannon and Thumper are counted as "rocket" weapons, when this is clearly not the case based on their designs and effects. Questions may also be asked about the Howitzer Gun, which is a similar weapon to the Dragon's Breath Cannon that is not allowed in the Rocket Trial.
Prizes & Requirements
|
|
|
Tips & TricksThe original Summer Camp wasn't a difficult event overall, but definitely did pack a few tricky challenges, specifically in the final week with no restrictions. The second one followed largely in the same suit, except for the final challenge at the end which was almost like a standalone event in terms of length and complexity.
The first four Trial 1 tiers with shotgun weapons don't require much effort at all and should not be difficult, even for newbies. This means that, at least for the first trial, purchasing the Close Quarters Bundle solely to skip tiers is a total waste of money. Tier 3 might look difficult at first, but it's more time consuming than anything else. The fifth and sixth tier get a bit more interesting, but still aren't overly strenuous and are certainly doable. The double kill mission shouldn't be difficult if you have a bit of patience. The final tier is, appropriately, the most difficult of them all. Placing first might be difficult against a bunch of players with the Shock Force Headset, which significantly improves the shotgun weapons that everyone is using in the event. If you happen to own the headset, I highly recommend equipping it. If you don't, I feel the Hunter Shotgun is the best weapon to compete with, as it gives you a major range advantage over those who choose any other weapon. On the flip size, though, there is the idea that using close-range weapons means it is easier to collect medals, which award tons of points and could assist in getting first place. Also, using an unboosted Hunter Shotgun against someone using the Hunter Shotgun with the Shock Force Headset is a bad idea, as they'll constantly one-hit KO you, and you won't be able to do the same to them. 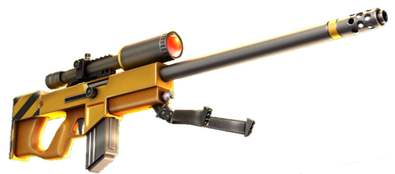
|
Table will be fixed in future; accidental deletion of 11 tiers
|
Trial 2 also opens with some incredibly easy tiers. The first two, completed in Missions, should be no problem at all to complete. Tier 3 is where the trial might start to piss you off a bit. Like last year, players have resorted to using the combination of the Anti-Explosive Armour and Medikit to make it extremely difficult for people to kill them with the explosive weapons allowed in the tier. I still wouldn't say tier 3 is hard though, considering that it's only 30 kills you have to get, which you can pick up from some newer players who don't own any anti-explosive armour. If Anti-Explosive + Medikit players are annoying you, just don't fight them at all, as it's not worth it. My thoughts of tier 4 are the same. It's not a difficult tier, but could end up being frustrating if your team keeps losing. Once again, using real money to purchase the Close Quarters Bundle to skip this tier is a waste of money. Tier 5 is, in my opinion, the hardest of the bunch. The weapons allowed in the event are easier to aim at close ranges, but are inaccurate at longer ranges, the range necessary to pass this tier. Once again, though, it's only 20 kills necessary, which should be a breeze. Finally, there's tier 6, which isn't a hard tier. Due to Respawnables' scoring system in Team Vs., winning matches is pretty much a 50/50 chance. Past the annoyances caused by that though, you should have no problem getting in the top 3, especially since a match would have to have at least 7 participants for 4th place to be an option in the first place. If you keep getting 4th, just go around picking up medals. This will boost your score, and increase your team's chance of winning the match. You could also leave the match and join a new one with 6 or less players, as you will then be guaranteed a place in the top 3 regardless of how badly you may play.
As per usual, the sniper range started out in Missions with some extremely simple challenges that should be no problem at all to complete. Tier 3 is an interesting challenge, which is fortunately cumulative (which means you don’t have to do it all in one match). 15 headshots can be acquired with some patience and time. I recommend using the Anti-Material Sniper, as it’s overall better than the Sniper Rifle. For this mission, I prefer it instead of the Hunter Rifle, since the Anti-Material Sniper always fail to KO with a body unlike the Hunter Rifle. This means that getting a headshot is incentivised, so I may be more inclined to aim for it naturally. Tier 4 is an easy tier that should also not cause any problems. Tier 5 is where this trial gets a bit interesting. Killing four enemies in a row could be quite difficult during this sniper event, with people constantly preparing to snipe you as soon as you expose yourself. The Hunter Rifle is better for this one as quickscoping and running away are both better with the weapon. Tier 6 could also end up being annoying, especially with people disconnecting or hiding throughout a match. If you don't have a good strategy, this could end up taking a long time. My recommendation for this one is to use the Hunter Rifle so you can run around faster. Then, once you've identified a targetable player, follow them around and kill them on spawn. Using the Spotter gadget is great for this, as it is for the rest of this event as well. This simple strategy should eventually get you the kills you need. To pass this tier, you'll just need to the same player once every 40 seconds; it's not as difficult as last year's 10 headshots in one match challenge!
As per usual, the sniper range started out in Missions with some extremely simple challenges that should be no problem at all to complete. Tier 3 is an interesting challenge, which is fortunately cumulative (which means you don’t have to do it all in one match). 15 headshots can be acquired with some patience and time. I recommend using the Anti-Material Sniper, as it’s overall better than the Sniper Rifle. For this mission, I prefer it instead of the Hunter Rifle, since the Anti-Material Sniper always fail to KO with a body unlike the Hunter Rifle. This means that getting a headshot is incentivised, so I may be more inclined to aim for it naturally. Tier 4 is an easy tier that should also not cause any problems. Tier 5 is where this trial gets a bit interesting. Killing four enemies in a row could be quite difficult during this sniper event, with people constantly preparing to snipe you as soon as you expose yourself. The Hunter Rifle is better for this one as quickscoping and running away are both better with the weapon. Tier 6 could also end up being annoying, especially with people disconnecting or hiding throughout a match. If you don't have a good strategy, this could end up taking a long time. My recommendation for this one is to use the Hunter Rifle so you can run around faster. Then, once you've identified a targetable player, follow them around and kill them on spawn. Using the Spotter gadget is great for this, as it is for the rest of this event as well. This simple strategy should eventually get you the kills you need. To pass this tier, you'll just need to the same player once every 40 seconds; it's not as difficult as last year's 10 headshots in one match challenge!
Trial 4 Tips & Tricks
The first three tiers should be extremely simple to do, easy for almost any player to complete with a little bit of time. From tier 4 and onward, however, this event is not an easy one and could end up taking a long time, especially with Digital Legends requiring players to complete the same challenges multiple times (as many as ten).
Tier 4 is not the hardest of the bunch. Seven kills is not difficult at all, and shouldn’t be difficult to accumulate. However, this tier will take a while keeping in mind that it requires you to complete it four times. Tier 5 could end up frustrating if you don’t have access to a decent sniper weapon, but should be passable with a bit of time. The Spotter gadget will help a lot with locating players and aiming the headshot. Tier 6 is an easier one; since it is Team Vs., your own team’s bonus medals should be everywhere. If you pick them up, you’ll get 100 points. So if you’re struggling, so pick up those medals and the tier should be no problem.
Tier 7 is one of the more difficult tiers in the event. Generally, I wouldn’t expect to be able to last a full four-minute match without dying, so my strategy was to either a) hide in a corner with the Cyber Ninja Breastplate and the Stealth gadget and wait it out or b) disconnect until I found a short match that I could just spend hiding in a corner. With both strategies, I equipped a reliable weapon with a high damage output, the Minigun, which helped ward off people who could see me with Spotter or came too close for comfort. Tier 8 shouldn’t be too much of a problem if you can just find a nice pack of players to clean up with a splash damage weapon or a weapon with high damage output. Thumper, Minigun and Battle Ram are the best in the game for this. Doing this five times, however, could end up being frustrating. Tier 9 isn’t difficult at first glance, until you see you have to do it ten times. Just going for the double kills with the aforementioned weapons should get you through this tier, eventually.
And finally, we have tier 10, which I believe is one of the hardest tiers in the event. For this one, I recommend using the same Cyber Ninja Breastplate and Stealth combination used in Tier 7, except you have to run around this time. This tier could end up quite annoying with Spotter users being prevalent in the competitive nature of this trial, so have some patience with it and you’ll get there. Tier 11 should be no problem if you’ve made it this far; once again, if you’re having trouble, use Spotter gadget and an overpowered weapon like Minigun, Battle Ram of Thumper. Tier 12 requires that you use a one-shot kill weapon, which there are plenty of in the game. Flare Gun is my favourite option for this one, since many players use enough health to prevent Thumper from being a one-shot kill. Flare Gun is more efficient that any sniper weapon, and feels faster than any shotgun weapon in the game. Tier 13 is similar to tier 10, which isn't a very good thing. Originally, this tier required that you pick up 10 medals in a row without dying, which was an incredibly difficult task that proved too much for many players. However, Digital Legends were kind enough to lower the requirement to 4 medals. It's not as hard as it was before, but still, without the same Breastplate + Stealth strategy, this one could end up being one of the hardest tiers in the event. You’ll need a ton of patience to get through this frustrating tier, but with some time you’ll pass it eventually. Tier 14 could be an annoying one, but only because you have to do it ten times. Like many of the tiers in this event, it’s time consuming, but not hard. Tier 15 should be a piece of cake for anyone who has gotten this far.
Tier 16 is another time-consuming-but-not-hard style tier. At best, this one will take you an hour to do, longer if you can’t reach 1000 in every match. Once again, not reaching 1000 is unlikely if you’re collecting medals and getting plenty of kills. If you kill ten enemies in the match and pick up each of their medals, you’ll have a point. Picking up your own team’s medals makes this even easier. Speaking of medals, tier 17 requires that you pick up 50 medals in Team Vs. matches, which should be incredibly easy but possibly take a while to do. Tier 18, however, is an annoying tier. Double kills always seem difficult to some across when you’re looking for them specifically! Once again, splash damage weapons and weapons that kill fast like Thumper or Battle Ram and your best bet for the tier. Without weapons like this, this tier could take a long time. Tier 19 is not too hard, and is one you should acquire pretty easily by just playing normally.
Finally, we have tier 20, which, inappropriately, is an easy tier. If you passed tier 12 with no problem, you’ll pass this one with no problem. If you made it this far, enjoy your new sniper!
Road Warrior Bundle
The premium-only Road Warrior Bundle decreases damage caused by various weapons, all of which happen to be weapons used in the event. The head part provides 20% protection against snipers; the body and leg parts do the same for explosives and shotguns respectively. The bundle is, to me, a mixed bag in terms of usefulness. The sniper nerf is not very significant against the Anti Material Sniper or the Sniper Rifle, which both remain 2HKO weapons. However, the Hunter Rifle takes a hit, losing its ability to OHKO. The effects still aren't particularly noticeable though, as any player who uses 10% health armour would survive a Hunter Rifle shot anyway. The Semi-Automatic Sniper also takes a fairly significant hit, often becoming a 3HKO and forcing a reload in order to get a kill, drastically decreasing the speed it'd normally work at. The body part is identical to the Anti-Explosive Vest. It's a good item, but based on how many times the Anti-Explosive Bundle has been available, many players would already have the Anti-Explosive Vest that does the same thing. The leg part, however, is the extremely useful. Its ability to weaken shotgun weapons is fantastic, especially after the SF Headset was just introduced. While 20% is not nearly enough to counteract the SF Headset with 60%, it's still useful and is the only part that provides protection against the Automatic Shotgun and the Hunter Shotgun, both powerful weapons.
